Szalagparketta
Minőségi parketták - Több mint 48 év tapasztalattal

Moment termékcsalád

Vision termékcsalád
Termékek
Városnevekkel beazonosítható különleges megmunkáltságú és felületkezelésű kollekciónk.
BEFAG parketta nem kérdés
100% - ban természetes anyag
Ez a termék 100%-ban természetes anyagokból készült, mesterséges adalékanyagok és vegyszerek nélkül. A természet erejét tisztelve és megőrizve, minden összetevő gondosan válogatott, hogy a legjobb minőséget és tisztaságot nyújtsa. Válaszd a természetes utat, és tapasztald meg az igazi tisztaságot!
Minőségi alapanyag
Kiváló alapanyagok, amelyek garantálják a prémium minőséget! Minden termékünk a legjobb alapanyagok felhasználásával készül, biztosítva a hosszú távú megbízhatóságot és a kiemelkedő eredményt. Az alapanyagok minősége iránti elkötelezettségünk révén mindig biztos lehet benne, hogy a legjobbat kapja, versenyképes áron.
Versenyképes ár
Kiváló minőség elérhető áron! Versenyképes árainkkal garantáljuk, hogy a legjobb értéket kapja a pénzéért, anélkül, hogy kompromisszumot kellene kötnie a minőségben. Válassza szolgáltatásainkat, és élvezze a kedvező árak és a prémium minőség tökéletes egyensúlyát!
Megbízható partneri hálózat
Egy erős és megbízható partneri hálózat az alapja a hosszú távú sikernek. Büszkék vagyunk arra, hogy partnereinkkel szoros együttműködésben dolgozunk, biztosítva a folyamatos minőséget, innovációt és megbízhatóságot. Közös céljaink elérése érdekében építjük a bizalomra és kölcsönös támogatásra alapozott kapcsolatainkat, hogy ügyfeleink számára a lehető legjobb megoldásokat kínálhassuk.
Logisztika
Hatékony gyártási logisztika versenyképes áron! Szakértő csapatunk biztosítja, hogy gyártási folyamatai zökkenőmentesen és költséghatékonyan működjenek, anélkül, hogy a minőségben kompromisszumot kellene kötnie. Bízza ránk a gyártási logisztikát, és élvezze a hatékonyság és a versenyképes árak tökéletes összhangját!
Kiterjesztett garancia
Bízzon a jövőben is: Kiterjesztett garanciánk biztosítja, hogy hosszú távon is nyugodt szívvel használhassa termékeinket. Rugalmas, versenyképes feltételek mellett védelmet kínálunk, így bármilyen problémát gyorsan és hatékonyan orvosolunk, anélkül, hogy extra költségekkel kellene számolnia. Válassza a megbízhatóságot, és élvezze a kiterjesztett garancia előnyeit!
4 kontinens
28 ország
év tapasztalat
Tanúsítványaink & díjaink
BEFAG szalagparketta gyártás
Bakonyerdő Zrt. - BEFAG parketta
Harmóniában a természettel
Miért válasszon BEFAG Parkettát?
- Javarészt hazai erdeinkből kitermelt, fenntartható erdőgazdálkodásból származó válogatott alapanyag
- Folyamatos gyártásközi minőségellenőrzés
- Prémium minőségű készparketta
- Legmagasabb színvonalú lakkozás és olajozás
- Pontos szállítási határidők
- Megbízható, kiszámítható üzleti partnerség
- Tagja vagyunk az Európai Parkettagyártók Szövetségének
- Termékeinkkel többször nyertünk Magyar Termék Nagydíjat
- Magas minőségű termékeink az USA-tól, Európán keresztül egészen Kínáig számos országban jelen vannak.
GY.I.K.
- 1 Általános információ
-
BEFAG KÉSZPARKETTA SZERKEZETI FELÉPÍTÉSE
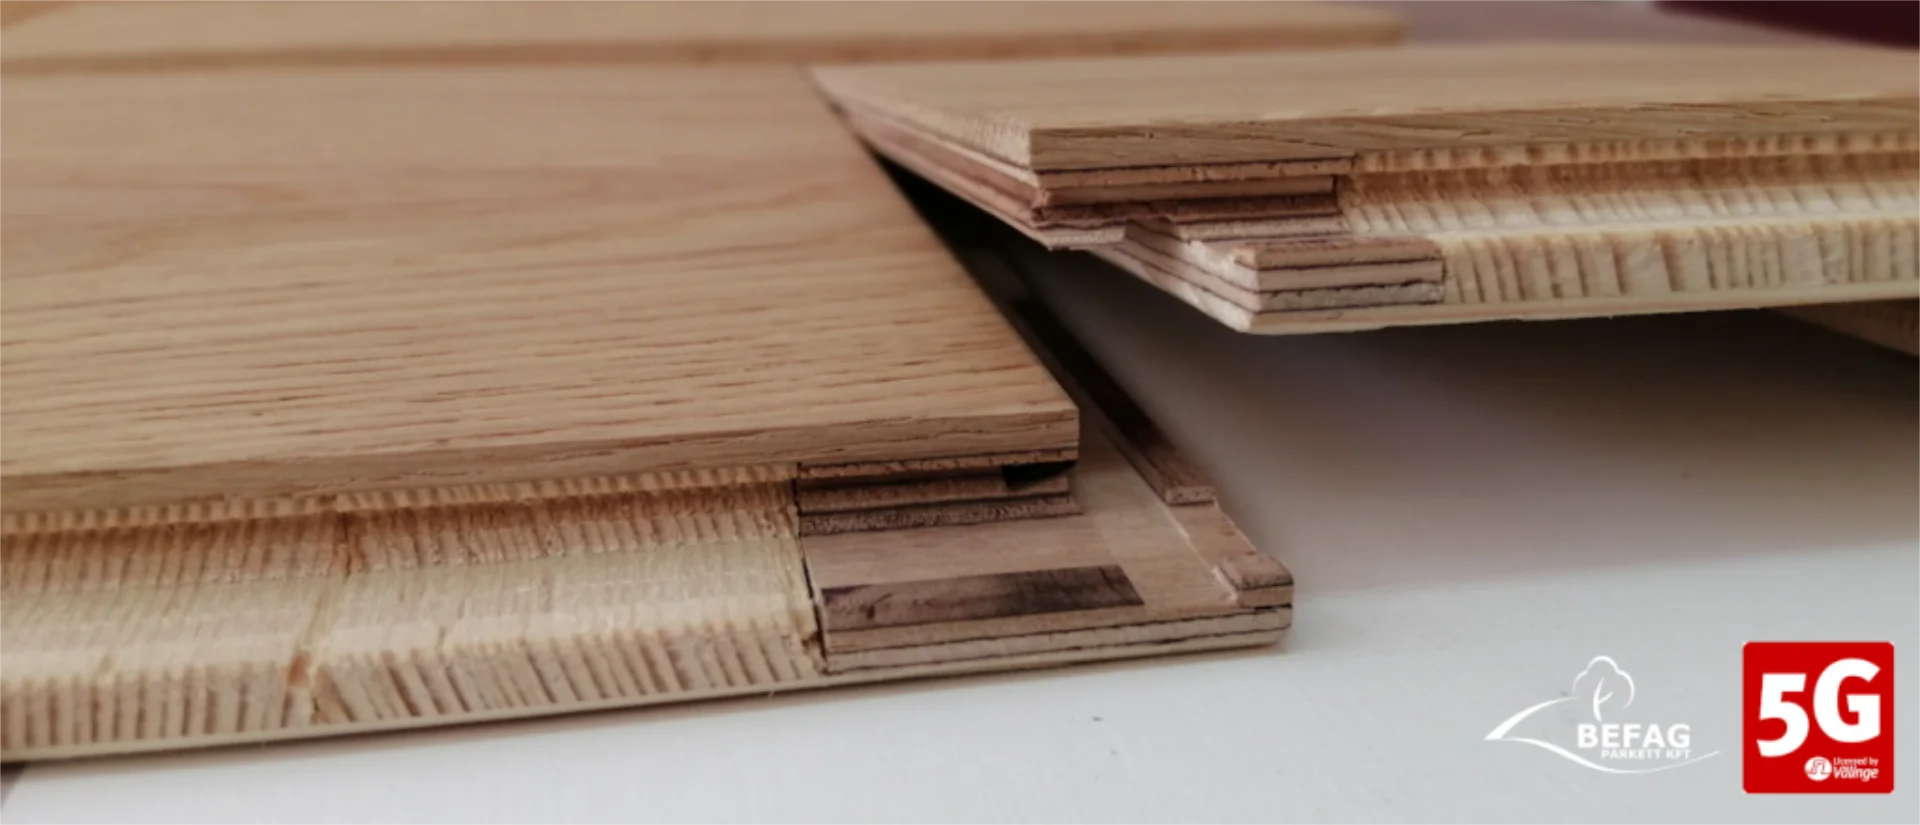
A BEFAG készparketta szerkezetileg három részből áll. Alsó és középrétege fenyőfából, járófelülete kemény fafajokból készül (3,1–3,5 mm), melyek színválasztéka, felületkezelése a burkolandó tér hangulatához igazítható felületet eredményez.

PARKETTA KIALAKÍTÁSOK
Egy sávos
A járófelület egy lamellából áll.Két sávos
A járófelület két lamella sorból áll.Három sávos
A járófelület három lamella sorból áll.BRINELL – KEMÉNYSÉG
A különböző fafajták különböző keménységűek. A nagy igénybevételnek kitett helyeken célszerű keményebb fafajtát választani. Az alábbi táblázat összehasonlítja a különböző fafajták keménységét.
Fafajok:
Amerikai dió – 2,8 kg/mm2
Gőzölt bükk – 3,3 kg/mm2
Tölgy – 3,5 kg/mm2 Cser – 3,5 kg/mm2
Kőris – 3,5 kg/mm2
Akác – 4,8 kg/mm2
Merbau – 4,9 kg/mm2Az adatok csak tájékoztató jellegűek; szakirodalom alapján.
JÓTÁLLÁS
A szerkezetre minden szabványos termékünknél 21 év, a lakkozásra 5 év jótállást vállalunk, a Jótállási jegyben foglaltak szerint.
CSOMAGOLÁSI EGYSÉGEK
- parkettaszál mérete: hossz × szélesség × vastagság
= 2200 mm × 192 mm × 14 mm | = 2200 mm × 192 mm × 13 mm - egy köteg = 6 szál = 2,534 m2
- parketta súlya: kb 8 kg/m2
- 1 paletta = 88,69 2 = 35 köteg kb. 709 kg
- 1 teljes kamion = 33 paletta = 2926,77 m2
PADLÓFŰTÉS
A Befag készparkettái padlófűtéssel ellátott helyiségekben is alkalmazhatók. Erre a célra a katalógusban a megfelelő szimbólummal jelölt készparketta-típusokat ajánljuk. A fűtési rendszer tervezésénél, kivitelezésénél, továbbá a parketta beépítésénél és a rendszer üzemeltetésénél be kell tartani az előírásokat. Ehhez kérje „A padlófűtés és készparketta együttes alkalmazása” című részletes tájékoztatónkat.
FONTOS TANÁCSOK A PARKETTA SZÁLLÍTÁSÁHOZ ÉS TÁROLÁSÁHOZ
- A parkettát tiszta, száraz, nedvességtől védett szállítótérben, sérüléstől óvva kell szállítani.
- A beépítés időpontjáig fedett, száraz, közvetlen időjárási hatásoktól védett helyiségben kell tárolni úgy, hogy a környezetből nedvességet ne vehessen fel.
- A parketta tárolása és felhasználása során fontos az optimális hőmérséklet és páratartalom biztosítása.
- Az optimális tárolási és felhasználási klíma 8–9 % egyensúlyi fanedvességnek felel meg; ez 20 °C esetén 40–55 % relatív légnedvességet jelent.
INFO
Lehetőség van a fent bemutatottaktól eltérő felületkezelésre is. Ha ilyen jellegű igénye van, az alábbi címen kérhet segítséget: ertekesites@befag.hu
ILLESZTÉSEK
A CLASSIC készparketta hagyományos csaphorony kialakítású; a szálakat ragasztó segítségével illesztjük egymáshoz.
A PanLoc önzáró készparketta egy olyan mechanikus zárrendszerrel rendelkezik, melynek lerakásához nem feltétlenül van szükség ragasztóra. Az illesztés ellenáll a normál igénybevételeknek anélkül, hogy a parkettaszálak elmozdulnának egymástól. Előnye, hogy sérülésmentesen szétszedhető és újra lerakható.
Az oldalunkon megjelenített fotók nem képesek a természetes faanyagban még a gondos válogatás ellenére, egy-egy minőségi osztályon belül is meglévő sokszínűséget teljes szépségében bemutatni, ezért vásárlás előtt tájékozódódjék alaposabban a Befag helyi forgalmazójánál vagy a gyártónál.
A fa természetes termék, ezért színe és szerkezete eltérő. Az EN 13489 szabvány szerint egy kötegben 3% eltérő minőségű lamella elfogadott. - parkettaszál mérete: hossz × szélesség × vastagság
- 2 Relatív páratartalom
-
Relatív páratartalom
A fa természetes eredetű, inhomogén felépítésű természetes anyag. Finom, rostos szerkezete miatt mindig tartalmaz vizet és a környezeti páratartalom változásának hatására képes nedvességet felvenni, illetve leadni. A sok összetevő között is az első helyen a cellulóz áll. Ennek aránya irodalmi adatok szerint 40 – 50 %. Elsősorban ez a rostos szerkezetű anyag játssza a legfontosabb szerepet a vízforgalomban.
A természetes eredetű, rostos anyagok, mint a fa vagy a textil, a levegő nedvességtartalmának változása hatására reagálnak. Az ásványi eredetű építőanyagok, a beton és a tégla is hasonlóan viselkednek, de rostos anyagok esetében ez méretváltozással is járhat, különösen faanyagok esetén.
A gyakorlatban fontos tudni, hogyan változik a fa nedvessége a levegő relatív páratartalmának és hőmérsékletének változásával. Nagy jelentősége van a nedvességegyensúlynak, mert ez mutatja meg, hogy milyen nedvességet fog tartalmazni a felhasználási körülményektől, a levegő relatív páratartalma és hőmérsékletétől függően.
Az említett fizikai törvényektől nem tudjuk magunkat függetleníteni. Lakókörnyezetünkben fontos ennek a régi, sokoldalúan és egészségesen alkalmazható anyagnak a használata.
Ma már számos korszerű technikai lehetőség van a kellemetlen hatások kiküszöbölésére.
Az esetünkben gondot okozó alacsony páratartalom nemcsak a fára, hanem elsősorban az emberi szervezetre is többszörösen káros következményekkel járhat. A következő ábra a legismertebb negatív tényezők páratartalomtól függő változását szemlélteti.
Az ideális lakótéri, illetve munkahelyi levegőklíma szempontjából, a hőmérsékleten és a levegőtisztaságon kívül a páratartalomnak is meghatározó jelentősége van.
A mi földrajzi viszonyaink között a túlzottan nedves környezet gyakorisága viszonylag kisebb. Ha tartósan előfordul, akkor a páratartalmat csökkenteni kell. A túl nedves környezetet zárt, jól záródó ablakoknál, nem szellőző falaknál, gyakori nedvességbevitellel, mint főzés, teregetés mi is előidézhetünk.
A különösen hosszú, kontinentális téli hónapokban a túlzottan száraz levegő negatív hatásai viszont igen jelentősek.
A fűtési szezonban a túlzottan száraz levegő elkerülésére a szellőztetés nem használ. Amennyiben ebben az időszakban mesterséges nedvesítéssel nem tudjuk a levegő “szomjúságát” csökkenteni, úgy az a környezetből fog vizet elvonni, a bőrből, a nyálkahártyából, a növényekből és a fából készült termékekből.
A levegő nedvességtartalma mérhető, melyet a relatív páratartalom mérőszámmal fejezünk ki. Ennek mérésére szolgál a hygrometer, azaz a páratartalom mérőműszere. Orvosilag a 40 – 60 % páratartalom ajánlott, mely esetén a levegőt ideális nedvességűnek érezzük. Ez az érték elsősorban egészségünk szempontjából fontos, de ideális növényeinknek, állatainknak, bútorainknak és a parkettának is.
A relatív páratartalom azt jelenti, hogy egy adott hőmérsékleten a levegő mennyi vizet tartalmaz ahhoz képest, amennyit maximálisan képes felvenni egy adott hőfokon. Ezért is van jelentősége a hőmérsékletnek, ugyanis minél melegebb a levegő, annál magasabb lehet a víztartalma (gr / m3) is.
A relatív páratartalom a felmelegítés következtében mintegy a felére csökkent. Pontosan ez következik be, amikor szellőztetünk.
Télen, fagypont alatt a levegő pedig már csak maximum 1 – 2 gr/m3 vizet tartalmaz, mely lakótérbe kerülve, párásítás nélkül 12 % légnedvességet eredményezne. A gyakorlatban, pótlólagos nedvességfelvétel folytán (ember, növények, kisebb párásítók) ez az érték 18 – 25 % alá nem szokott süllyedni. Fontos azonban felhívni a figyelmet arra, hogy még ez az érték is rendkívül alacsony. A túlzottan száraz levegő következményei:
· kellemetlen közérzet, csökkenő oxigénfelvétel és-szállítás a véráramba · meghűléses megbetegedés fokozódó veszélye · száraz bőr · porképződés · bútorok, parketta károsodása, repedések
A faanyag bevezetőben említett, nedvességváltozással kapcsolatos tulajdonságai a parkettáknál még fokozottabban érvényesülnek. A vastagsághoz képest nagy felületek érintkeznek a környezettel. A készparketták esetében pedig az egyes elemek méretei is megnőttek.
Tapasztalható bizonyos ingadozás attól függően, hogy az adott fa milyen körülmények között fejlődött, de némi egyszerűsítéssel és kerekítéssel a legjellemzőbb értéke 0,33 % .
Ez azt jelenti, hogy 1 % fanedvesség csökkenésre a milyen mértékű zsugorodás következik be.
3. példa
Csaphornyos parketta nedvessége 8 %-ról 5 %-ra csökken, tehát a várható méretváltozás: 3 x 0,33 = 0,99 % Ha az elem szélessége 65 mm, akkor a várható résméret
0,0099 x 65 = 0,64 mm
4. példa
Készparketta esetében
3 x 0,0033 x 192 = 1,9 mm
Ez elég ijesztő mértékűnek tűnik, de a készparketta háromrétegű felépítése miatt, a középső réteg stabilizáló szerepének köszönhetően a zsugorodás mintegy 70 % -kal csökken. Ennek megfelelően, a legkedvezőtlenebb viselkedésű bükk fafaj esetében sem lehet a gyakorlatban 0,5 – 0,6 mm-nél nagyobb réseket mérni, elemenként. Abban az esetben, ha pl. egy nehéz bútor miatt az egyes elemek mozgása korlátozott, illetve több elem együtt mozog rés keletkezése nélkül ( összeragasztva), akkor ezek az értékek összeadódnak.
Várhatóan kritikus esetekben, az utóbbi években egyre jobban terjed az úsztatott lerakási mód helyett a betonhoz ragasztással történő rögzítés. Padlófűtés esetén ezt egyébként is javasoljuk a jobb hőátadás miatt. Talán innen jött a gyakorlati felismerés, hogy ez a rögzítési mód kedvezőbb a rések keletkezése szempontjából is. Hangsúlyozandó, hogy rések keletkezése ez esetben sem kerülhető el extrém klimatikus körülmények között, de a rések előbb említett összeadódása megakadályozható.
A ragasztásos lerakási mód lényegesen jobb, egyenletesebb betonfelületet követel, különben az egyébként sem olcsó ragasztóból indokolatlanul nagy lesz a felhasználás. Többszintes épületek esetén külön fel kell hívni a figyelmet a hangszigetelés megoldására is, mivel értelemszerűen az alátét hablemez nem alkalmazható.
Ez a jelenség a lakás tulajdonosa számára kellemetlen, de igen száraz klíma esetén elkerülhetetlen. A nyári hónapokban, a páratartalom megnövekedésével a rések ismét eltűnnek. Ebben az évszakban az egyensúlyi nedvességtartalom elérheti a 11 %-ot, de ez az érték a fa rugalmassága folytán még nem okoz károsodást. Klimatizálás Sajnálatos módon ez a fogalom gyakran csak nyári melegben a hűtést jelenti, esetleg egy mérsékelt visszanedvesítéssel kombinálva. A téli jelentőségét már ismerjük, de megoldásként a kisebb szobai párásítókkal lehet találkozni a piacon. Ezek teljesítménye és szabályozhatósága kérdéses, mint ahogy ez az egyik lakásban mérhető is volt. Ezen túlmenően a bejuttatott nedvesség egyenletes elosztása is lényeges.
A lakótéripárásító készülékekből bőséges a kínálat, de teljesítményében és szabályozozttságában magas minőség kevesebb akad. A fűtéssel elgőzölögtető párásítók energiaigénye viszonylag magas,és a meleg gőz biológiailag sem kedvező. A hideg, nedves felülettel párologtatók teljesítménye általában kicsi. Az ultrahangos berendezések jelenthetik az igazán kedvező megoldást. A szakterület részletes ismeret nélkül úgy tűnik, hogy a mellékelt anyag szerint megjelent egy új generáció. Az eddigi fizikai ismeretek szerinti 40 – 100 kHz ultrahang frekvencia helyett 1700 kHz-en üzemelnek. Ennek következtében lenyegesen megnő
a ” l/óra ” teljesítmény, mindössze 0,05 KWh energiafogyasztás mellett (melléklet ). Az hideg párásító berendezések viszont bizonyos vízelőkészítést(lágyítást) igényelnek, különösen keményebb vizek esetén.
Egy 100 m2 alapterületű lakást véve (belmagasság 2,70 m) melynek relatív páratartalma 20 °C -on 19 % (azaz 3 gr/m3) , az összes víztartalom:
100m2 x 2,70 x 0,003 = 0,81 kg
Az ideális állapot eléréséhez biztosítani kellene ugyancsak 20 °C -on 50 %-ot, amikor a teljes vízmennyiségnek
100 x 2,70 x 0,008 = 2,16 kg
kellene lenni. A hiányzó 1,36 kg nem tűnik jelentősnek, de csak egy pillanatnyi állapotot tükröz. Egy már kiszáradt lakásban sok egyéb nedvszívó anyag is van (textil, bútorok, tapéta, függönyök), tehát a valós “vízhiány” a fent számítottnál lényegesen nagyobb.
Véleményünk az, hogy egészségünk és értékeink megóvása érdekében, építész és épületgépész szakmai körökben sokkal nagyobb jelentőséget kellene tulajdonítani ennek a kérdésnek. A korszerű nyomda-, papír-, és textilipar egyes területei e nélkül ma nem is működhetnének. Kínálat pedig a szakvásárokon, szakmai folyóiratokban és az interneten is ma már bőségesen megtalálható.
Megj.: A közölt adatok szakirodalomból vett, tájékoztató jellegű értékek. - 3 Felületkezelés
-
Felületkezelés
Strukturálás: A parketta felületét speciális kefékkel dolgozzuk meg. A végleges felület a laza, lágyabb részek meghatározott mélységben történő kikefélésével alakul ki. Ez a művelet még jobban kihangsúlyozza a fa természetes erezetét, rajzolatát. A felület nyitott (edények, pólusok nem eltömítettek), így a természetes fában található nyitott kitöltetlen göcsök is láthatók.
Fózolás: A parkettaszálak két hosszanti vagy mind a négy élét 30 fokban marással letörjük, így lerakáskor az illetéseknél egy V-alakú, a letörés nagyságának megfelelő bevágás látható.
Meszezés: A strukturálással kialakított barázdákat egy fehér anyaggal töltjük fel, így jön létre a végleges felület. A felület nyitott (edények, pólusok nem eltömítettek), így a természetes fában található kisebb lyukas göcsök is láthatók.
Selyemfényű lakkozás: A legelterjedtebb felületkezelési módszer, mely hét lakkréteggel bevont, zárt pórusú, jó karc- és kopásálló tulajdonságokkal rendelkező, könnyen tisztítható felületet hoz létre.
Matt lakkozás (zártpórusú): A természetes anyag felületéhez közelítő, kevésbé fénylő lakkozás, amely a selyemfényű lakkhoz hasonlóan ellenálló és könnyen ápolható.
Olajhatású matt lakkozás (nyitott pórusú): a fa természetes rajzolatát még jobban kiemelő lakkozási eljárás. A felület nyitott (edények, pólusok nem eltömítettek), így a természetes fában található kisebb nyitott repedt göcsök is láthatók.
Pácolás: A pácolás lehetőséget nyújt a fa színének megváltoztatására, a természetes színtónusok további kiemelésére vagy egalizálására. A fa rajzolatának eltakarása nélkül változtatja meg a felület színét.
Készolajozott: Természetes olajjal történő felületkezelési eljárás, amely természetes megjelenést kölcsönöz a fának, ki emeli annak rajzolatát és erezetét. Lerakás után további olajozást nem igényel. Rendszeres ápolással őrzi meg több éven át az eredeti arculatát. A felület nyitott (edények, pólusok nem eltömítettek), így a természetes fában található kisebb lyukas göcsök is láthatók.
Lakkozatlan: Finom csiszolással előkészített felület, mely lerakás után a vevő igényének megfelelően bármilyen felületkezeléssel (olajozás, pácolás, lakkozás) tovább alakítható.
Erősített lakkozás: Magasabb igénybevételű helyekre (irodák, közösségi helyiségek) ajánlott, kopásállóbb felület.
Sportlakkozás: Ez a bevonat megfelel az EN 14904 szabvány előírásainak. A sportlakkozás speciális tulajdonságai révén egyrészt megakadályozza a csúszós felületek okozta baleseteket, másrészt elkerülhetővé teszi a túlzottan tapadó felületből eredő sérüléseket.
Tűzgátló lakkozás: Az ilyen felületrendszerrel kezelt parketta a Cfl-s1 tűzállósági osztályba tartozik, így magas tűzállósági besorolást előíró helyeken is felhasználható. - 4 Lerakási útmutató
-
Lerakási útmutató
ÚTMUTATÓ A BEFAG KÉSZPARKETTÁK ÚSZTATOTT BEÉPÍTÉSÉHEZ
Kedves Vásárló!
Az Ön által vásárolt minőségi készparketta esztétikus és tartós melegpadló burkolatot képez az Ön szobájában, ha betartja ezen útmutató előírásait. Előkészítés:
1. Tanulmányozza át gondosan a garanciális feltételeinket, melyeket a Garanciajegy tartalmaz, s csak ezután kezdje meg a parketta beépítését.
2. A parkettázást minden egyéb építési, szerelési munkának – festés, mázolás, szerelvényezés stb. – meg kell előznie, hogy a parketta sérülését, karcolódását elkerülje. Utómunka esetén a kész parkettafelület védelméről takarással gondoskodjon.
3. Ellenőrizze az aljzat minőségét: legyen pormentes, szilárd, egyenes és száraz. Az egyenességet ellenőrizze egy kb. 2 m-es vonalzóval: ha a 2 mm-t meghaladja az egyenetlenség, aljzatkiegyenlítés szükséges. A betonnedvességet méréssel ellenőrizze: 2 %-nál nem lehet magasabb. Ellenőrizze a helyiség levegőjének a páratartalmát: 40–60% között legyen normál szobahőmérsékleten.
4. Új épületszerkezet, új aljzatbeton esetén mindenképpen helyezzen el az aljzatra egy 0,2 mm vastag párazáró fóliát, de ajánlott egyéb más esetben is. Toldásoknál legalább 10 cm-es átfedést alkalmazzon!
5. Helyezze le a lépészajt elnyelő köztes réteget: 3mm-es polietilén hablemez, filc vagy parafa is alkalmas e célra.
6. Bontson ki a teljes felületnek megfelelő mennyiségű, vagy legalábbis több parkettaköteget, s vizsgálja meg azok tartalmát: a természetes faanyagra jellemzően az egyes parkettaszálak közt lehetnek olyan színárnyalatbeli eltérések, melyek megfelelő sorolásával a kész felület esztétikája tovább javítható.
Ha esetleg hibás parkettaszálat talál, azt ne építse be, tegye félre, kicseréljük, de a már beépített parketta esetében az ilyen anyagra nem tudunk kifogást elfogadni.
Használat: A használat során arra kell törekedni, hogy minél kevesebb extra behatás szennyeződés érje a parkettát. Az ajtó előtt lábtörlőt kell alkalmazni, hogy a finom homokszemcsék bejutását is megakadályozzuk, ugyanis ezek a legfinomabb csiszolószemcsék, melyek a lakkfelületet koptatják. A bútorok lába alá alátétet (pl.: filc) kell ragasztani, ami a karcolódástól megóvja a felületet. A pont szerű, erős terhelés káros a parkettára. Jó tudni, hogy a különböző fafajok kissé eltérő keménységűek, de a tűsarkú cipő még a legkeményebb fából készült parkettán is nyomot hagy. A görgőszékek görgői rendkívüli módon igénybeveszik a felületet, ezért mindenképpen e célra készített alátéttel kell védeni azt.
Tisztítás, karbantartás: A készparketta készre lakkozott vagy készre olajozott padlóburkoló termék, ezért lefektetését követő utánlakkozása nem szükséges, de igénybevételtől függően után olajozása szükséges. A készparketta száraz vagy alig nedves – legfeljebb ködnedves – ruhával illetve szakkereskedésben kapható padlóápoló szerekkel tisztítható, de használata során óvni kell a nedvességtől.
Felmosni tilos!
Vízben nem oldódó szennyeződést azonnal, oldószerével (kivéve az erősen maró anyagokat) lehet eltávolítani, de lehetőleg kerülni kell a vegyszeres tisztítást. A megkopott lakkréteg felújításakor a régi lakkot finom szemcsézetű csiszolópapírral (P 120-P 150) hosszirányban kell megcsiszolni. A képződött port a felületről gondosan el kell távolítani, ezután lehet lakkozni több rétegben. Az egyes rétegek felhordása között a felületet finom csiszolópapírral fel kell érdesíteni. A lakkozás előtt próbalakkozást kell végezni. Próbalakkozás után gondosan meg kell vizsgálni az új bevonat tapadását, elszíneződését és a felület minőségét. Csak a próba megfelelősége esetén kezdjen neki a teljes utánlakkozásnak. Lakkvásárlás előtt kérjen információt szakembertől. A lakkozás teljes körű felújításának szükségessége nagymértékben késleltethető a kereskedelmi forgalomban kapható padlóápoló szerek rendszeres alkalmazásával. Ne feledje: A faanyag még feldolgozott állapotban is „élő” anyag, s a szélsőséges klimatikus hatásokra – csakúgy, mint az ember – érzékenyen reagál.
Az ember és a parketta jó közérzetéhez tehát a megfelelő szobaklíma is hozzátartozik. Ez például 20 °C hőmérséklet esetén mintegy 45–55% relatív páratartalmat jelent. Ha a fűtési idényben a relatív légnedvesség tartósan vagy gyakran a fenti érték alá csökken, a parketta rendkívüli módon kiszáradhat, s az egyes elemek közt, de azokon belül is rések képződhetnek. Ez természetes jelenség. Ennek megakadályozására, szükséges a fűtési idényben a páratartalom és a hőmérséklet folyamatos mérése és a megfelelő mértékű pótlása mesterséges légnedvesítéssel. Tartósan túl nedves, párás klíma esetén mesterséges páracsökkentés szükséges erre alkalmas készülékekkel. (klíma, párakivonó készülék)
Fontos! Ez a parketta fából készült, ezért a természetes fára jellemző sokszínűséget, szerkezeti sokféleséget kismértékben még egy-egy minőségi osztályon belül is tükrözi, ezért a kiadványainkban látható parkettaminták csak tájékoztató jellegűek. PanLoc rendszerű készparketta úsztatott beépítése. - 5 Tisztítás és karbantartás
-
Tisztítás, karbantartás
1. Lakkozott felület
Használat
A használat során arra kell törekedni, hogy minél kevesebb extra behatás, szennyeződés érje a parkettát. Az ajtó előtt lábtörlőt kell alkalmazni, hogy a finom homokszemcsék bejutását is megakadályozzuk, ugyanis ezek a legfinomabb csiszolószemcsék, melyek a lakkfelületet koptatják. A bútorok lába alá alátétet (pl.: filc) kell ragasztani, ami a karcolódástól megóvja a felületet.
A pontszerű, erős terhelés káros a parkettára. Jó tudni, hogy a különböző fafajok kissé eltérő keménységűek, de a tűsarkú cipő még a legkeményebb fafajból készült parkettán is nyomott hagy. A görgősszék görgői rendkívüli módon igénybe veszik a felületet, ezért mindenképpen e célra készített alátéttel kell védeni azt.
Tisztítás, karbantartás
A készparketta készre lakkozott padlóburkoló termék, ezért lefektetését követő utánlakkozása nem szükséges. A készparketta száraz vagy alig nedves legfeljebb ködnedves ruhával illetve szakkereskedésben kapható padlóápoló szerekkel tisztítható, de használata során óvni kell a nedvességtől. Ajánljuk az OVERMAT (forgalmazó:BEFAG Parkett Kft) Parkettatisztítót.
Vízben nem oldódó szennyeződést azonnal, oldószerével (kivéve az erősen maró anyagokat) lehet eltávolítani, de lehetőleg kerülni kell a vegyszeres tisztítást.
A megkopott lakkréteg felújításakor a régi lakkot finom szemcsézetű csiszolópapírral (P 120-P150) hosszirányban kell megcsiszolni. A képződött port a felületről gondosan el kell távolítani, ezután lehet lakkozni több rétegben. Az egyes rétegek felhordása között a felületet finom csiszolópapírral fel kell érdesíteni. A lakkozás előtt próbalakkozást kell végezni. Próbalakkozás után gondosan meg kell vizsgálni az új bevonat tapadását, elszíneződését és a felület minőségét. Csak a próba megfelelősége esetén kezdjen neki a teljes utánlakkozásnak.
Lakkvásárlás előtt kérjen információt szakembertől. (Ajánlott lakktípus: oldószeres parkettalakk) A lakkozás teljes körű felújításának szükségessége nagymértékben késleltethető a kereskedelmi forgalomban kapható padlóápoló szerek rendszeres alkalmazásával.
Ne feledje
A faanyag még feldolgozott állapotban is “élő” anyag, s a szélsőséges klimatikus hatásokra – csakúgy, mint az ember – érzékenyen reagál. Az ember és a parketta jó közérzetéhez tehát a megfelelő szobaklíma is hozzátartozik. Ez például 20 °C hőmérséklet esetén mintegy 45-55% relatív légnedvességet jelent. Ha a fűtési idényben a relatív légnedvesség tartósan vagy gyakran a fenti érték alá csökken, a parketta rendkívüli módon kiszáradhat, s az egyes elemek közt, de azokon belül is rések képződhetnek. Ez természetes jelenség. Ennek
megakadályozására, szükséges a fűtési idényben a páratartalom és a hőmérséklet folyamatos mérése és a légnedvesség megfelelő mértékű pótlása mesterséges légnedvesítéssel.
Fontos!
Ez a parketta fából készült, ezért a természetes fára jellemző sokszínűséget, szerkezeti sokféleséget kismértékben még egy-egy minőségi osztályon belül is tükrözi, ezért a kiadványainkban látható parkettaminták csak tájékoztató jellegűek.
2. Natúr készolajos felület
Tisztítási és ápolási útmutató a gyárilag készre olajozott parkettához
Az olajos felület jellegzetessége, hogy kiemeli az egyes fafajok egyedi rajzolatát. Ezek a lélegző felületek természetességükkel kellemes hatást keltenek. Az olajozott padlók tartóssága és kopásálló tulajdonsága nagyban függ a rendszeres és helyes tisztítástól, ápolástól.
Annak érdekében, hogy parkettáját sokáig élvezni tudja, kérjük, tartsa be az alább felsorolt tanácsokat!
Használat
A használat során törekedni kell, hogy minél kevesebb extra behatás, szennyeződés, illetve nedvesség érje a parkettát. A kisebb kavicsok és a finom homokszemcsék bejutását meg kell akadályozni, ugyanis ezek a legfinomabb csiszolószemcsék, melyek a felületet koptatják, karcolják. Rendszeresen porszívó segítségével a bejutott szennyeződéseket el kell távolítani. A pontszerű, erős terhelés káros a parkettára. A különböző fafajok eltérő keménységűek, de a tűsarkú cipő még a legkeményebb fából készült parkettán is nyomot hagy. A bútorok lába alá alátétet (pl.: filc) kell ragasztani, ami a karcolódásoktól megóvja felületet. A görgős székek görgői rendkívüli módon igénybe veszik a felületet, ezért mindenképpen erre a célra készített alátéttel vagy gumi görgővel kell védeni azt (EN12529).
A parkettát és a felületét egyaránt óvni kell a nedvességtől, a kifröccsent vizet vagy egyéb folyadékot azonnal fel kell törölni. A túl gyakori vagy túl nedves ruhával történő tisztítás károsíthatja a felületet.
Fektetés utáni első ápolás
A parketta gyárilag készre olajozott, fektetés után nem szükséges a további olajozás. Ha Ön mégis úgy dönt, hogy a felületet utána olajozza, kérjük ennek szakszerű elvégzéséről előtte tájékozódjon vagy szakemberrel végeztesse.
Ennek ellenére a nagy forgalmú helyeken (közületek) javasoljuk a felület lerakás utáni első ápolásának elvégzését, így ez egy további védő anyagként szolgál. Közvetlen a fektetés utáni első ápolás lakótérben nem feltétele a használatba vételnek, de amennyiben úgy dönt a következőképpen végezze:
1. A fektetés után porszívózással távolítsa el a port és az egyéb szennyeződéseket.
2. Az OVERMAT (forgalmazó: BEFAG Parkett Kft.) karbantartó olajat hordja fel kis mennyiségben és puha kendővel vagy pad-el egyenletesen dörzsölje be a felületbe. A felesleget távolítsa el. Az olajat ne ecsettel vagy hengerrel hordja fel, mert sok anyagvesztéshez vezethet és a száradási idő is megnövekszik.
3. 6-12 óra száradás után a felület használatba vehető, de egy hétig a vizes tisztítást kerülni kell.
Száraz tisztítás
Az olajos felület tisztításához általában elegendő a parkettához alkalmas porszívó fejjel történő porszívózás.
Nedves tisztítás és ápolás egyben
A száraz tisztítás után használjuk OVERMAT (forgalmazó: BEFAG Parkett Kft.) Parkettatisztító vizes ápolószert, ami egy természetes, oldószermentes vízzel hígítható termék, tisztítja és ápolja a parkettát egyben. Az ápolás gyakorisága függ a használat intenzitásától. Magán házban, lakásban 2-4 hetente, közösségi terekben, irodákban 1-2 hetente, étteremben, üzletekben 1-2 naponta.
1. Ha már egy másik ápolószerrel kezelték a felületet vagy erősen ragadós, koszos a felület, akkor javasoljuk Az OVERMAT (forgalmazó: BEFAG Parkett Kft.) Parkettatisztítószer használatát, hogy eltávolítsuk a szennyeződéseket és régi filmhártyát.
2. Tisztítószert vízzel hígítva (fél kupaknyi 5 liter vízben) puha ruhával vagy nedves moppal kell felvinni.
3. Száradás után (kb. 30 perc) javasoljuk a felület áttörlését puha pad-el vagy pamut ronggyal. Így javul a felület optikai megjelenése.
Frissítés, Felújítás
Későbbiekben, ha felület használat során elveszti fényét vagy a felületén megkarcolódik egyszerűen felfrissíthető az OVERMAT (forgalmazó: BEFAG Parkett Kft.) karbantartóolaj használatával, így az olajozott padló élettartama meghosszabbodik.
1. Porszívózással távolítsa el a port. Az OVERMAT (forgalmazó: BEFAG Parkett Kft.) Parkettatisztítószer használatával tisztítsa meg a felületet az egyéb szennyeződésektől.
2. Az OVERMAT (forgalmazó: BEFAG Parkett Kft.) karbantartóolajat hordja fel kis mennyiségben és puha kendővel vagy paddel egyenletesen dörzsölje be a felületbe. A felesleget távolítsa el. Az olajat ne ecsettel vagy hengerrel hordja fel, mert sok anyagvesztéshez vezethet és a száradási idő is megnövekszik.
3. 6-12 óra száradás után a felület használatba vehető, de egy hétig a vizes tisztítást kerülni kell.
Kérjük, tartsa be az alább leírtakat minden kezelésnél!
A használat előtt próbálja ki a szert egy kevésbé létható helyen, hogy annak hatását megtapasztalja.
Ha van rá mód, mindig kezeljük a teljes felületet, hogy a parketta kinézete egységes maradjon.
Soha ne használjon dörzsölő, erős alkáliákat vagy oldószer tartalmú tisztítószereket! Ezek hosszú távra tönkretehetik a felületet.
Az olajjal átitatódott eszközök öngyulladás veszélyesek, ezért azokat használat után terítse ki és szellőztesse ki, amíg teljesen meg nem szárad vagy tegye vízbe.
Minden esetben tartsa be a gyártó figyelmeztetéseit!
Kapcsolat
BEFAG Parkett Kft.
- 8300 Tapolca
Külterület HRSZ.01692 -
Telefon: +36 87 511 310 E-mail: info@befag.hu
Értékesítés
- Steiner Zsolt
Belföldi értékesítési vezető -
Telefon: +36 30 33 11 449
+36 87 511 014E-mail: steiner.zsolt@befag.hu
ertekesites@befag.hu
Export
- Szántóné Pető Csilla
(English) -
Telefon: +36 30 375 83 67
E-mail: szantone.csilla@befag.hu
sales@befag.hu
Export
- Farkas-Lenner Júlia
(German) -
Telefon: +36 30 956 80 40
E-mail: lenner.julia@befag.hu
sales@befag.hu
